MH Justice Latout Manual
X 24 시간 닫기 X

MH Multi Widget

  1. Shopping
  2. 주문상태
  3. 주문QA
  4. Demo
  5. 메뉴얼
  6. 제작의뢰
  7. XE작품
  8. 가입인사
1.0x
form 문에서 여백없애기 ################### 1 <form .....> 이런 문은 기본적인 여백이 있습니다. 그럴때마다 style="margin:0px;padding:0px;" 라고 쓰기는 상당히 귀찮은 일일겁니다. 항상 읽어 들이는 style.css 가 있다면 다음과같이 추가 합니다. form {padding:0px; margin:0px} 라고 추가 해 놓으면 어떠한 문장에서든지 form 문은 여백이 없어집니다. 셀렉트 박스에서 내용 우측정렬시키기 ################### 2 <SELECT style="direction:rtl;"> <OPTION>내용</OPTION> <OPTION>내용</OPTION> </SELECT> 간단히 링크점선 없애기 ################### 3 보통 링크의 점선을 없애기위해 자바스크립트를 이용하거나 onfocus=this.blur(); 이런식으로 처리를 하시죠? css 한 줄로 텍스트링크, 이미지링크 모두 처리가 가능합니다. a { selector-dummy : expression(this.hideFocus=true);} 셀렉트박스(풀다운)에 색깔 넣기 ################### 4 <select style="font-size:9pt;"> <option>select color <option style="background-color:000000;color:white" value="#000000">black 자주 사용하는 css 속성 ################### 5 글꼴장식 text-decoration : 장식 글꼴 장식을 지정한다.(none,underline,overline,line-through,blink) none : 장식 제거 underline : 밑줄 overline : 윗줄 line-through : 문자 중간에 선 첨가 blink : 문자 깜빡임 글씨굵기 font-weight : 굵기 글꼴의 굵기를 설정한다. normal : 보통 글씨 bold : 굵은 글씨 lighter : 한단계 가는 폰트 bolder : 한단계 굵은 폰트 수치 : 100 ~ 900 (normal : 400, bold : 700에 해당) font-style : (normal,italic,oblique) 글씨체 font-family : 글꼴 이름, 글꼴 이름, … 글꼴 종류를 지정할 때 사용한다. serif : 명조체 (예 : Times New Roman, 바탕체) sans-self : 고딕체 (예 : Helvetaca, Arial, 돋움체) cursive : 필기체 계열 (예 : Caflisch Script, Adobe Poetica) fantasy : 장식 글꼴 (예 : Critter, Cottonwood ) monospace : 고정 비례 폭 글꼴(예 : Courier New) 글꼴의 이름은 하나만 지정할 수도 있고 컴마(,)로 구분해서 여러 개를 한꺼번에 지정할 수도 있다. 여러 개를 지정할 경우는 지정되어 있는 글꼴 중 앞에서부터 시스템에 설치되어 있는 글꼴이 적용된다. 문자간격 Spacing letter-spacing : 문자간격 text-indent : 문자 들여쓰기 line-height : 줄과 줄사이의 간격을 지정하기 위해 사용 word-spacing : 단어간격 문자와 문자간의 간격이나 단어와 단어의 간격을 설정할 때 사용한다. normal : 표준 글자간격 설정 (Default) 실수값 + 단위 : 표준간격에서 늘어나거나 줄어들게 된다. text-align속성으로 양쪽 정렬(justify)로 설정하면 지정한 결과가 나오지 않는 경우도 있다. 링크걸기 A:link { 스타일 } 보통상태의 링크를 의미한다. A:visited { 스타일 } 이미 방문한 링크를 의미한다. A:active { 스타일 } 클릭했을 때의 링크를 의미한다. A:hover { 스타일 } 커서가 올라갔을 때의 링크를 의미한다. 자주사용되는 글씨... 한글 | "굴림체","돋움체","바탕체","궁서체" 영어 | "Arial","tahoma","verdana","Impact","times","sans-serif","geneva","courier" Filter FILTER: shadow(color=navy,direction=135); FILTER: glow(color=navy,direction=135); writing-mode:tb-rl 글씨를 세우는 역활을 하는것 입니다 문자열 자르기 ################### 6 <style="overflow:hidden; text-overflow:ellipsis;"><nobr> 가로크기가 지정되어 있는경우에 사용할 수 있다. 둥근모서리 구현 ################### 7 <style> .rtop, .rbottom{display:block; background: #FFFFFF;} .rtop *, .rbottom *{display: block; height: 1px; overflow: hidden; background: #9BD1FA;} .r1{margin: 0 5px} .r2{margin: 0 3px} .r3{margin: 0 2px} .r4{margin: 0 1px; height: 2px} </style> <div id="container" style="background: #9BD1FA" align=center> <b class="rtop"> <b class="r1"></b> <b class="r2"></b> <b class="r3"></b> <b class="r4"></b> </b> <p>대류커뮤니티 CSS로 둥근 모서리 구현하기</p> <b class="rbottom"> <b class="r4"></b> <b class="r3"></b> <b class="r2"></b> <b class="r1"></b> </b> </div> CSS 만으로 구현하는 롤오버 이미지 ################### 8 <head> 와 </head> 사이에 아래의 구문을 삽입합니다. <style type="text/css"> a.rollover img { border-width:0px; display:inline; } a.rollover img.over { display:none; } a.rollover:hover { border:0px } a.rollover:hover img { display:none; } a.rollover:hover img.over { display:inline; } </style> 그리고 <body> 의 적당한 위치에 아래의 형식을 응용하여 이미지를 삽입하면 됩니다. <a href="주소" class="rollover"><img src="기본이미지"><img src="마우스 오버시 보여줄 이미지" class="over"></a> 일반적인 텍스트에 롤오버 적용하기 ################### 9 <span OnMouseOver="this.style.color='#blue'" OnMouseOut="this.style.color=''">내용</span> 스타일을 이용한 링크에 여러가지 효과 주기 ################### 10 <style type="text/css"> <!-- A:link {color:#666666; text-decoration:none} A:visited {color:#666666; text-decoration:none} A:active {color:#666666; text-decoration:none} A:hover {color:#blue; text-decoration:none} --> </style> 위와 같은 기본적인 스타일 소스에서 A:hover 를 잘 이용하면 다양한 링크효과를 줄 수 있습니다. 밑 줄 A:hover {color:#blue; text-decoration:underline} 굵 게 A:hover {color:#blue; text-decoration:none; font-weight:bold} 크 게 A:hover {color:#blue; text-decoration:none; font-size:11pt} 배경색 A:hover {color:#blue; text-decoration:none; background-color:#blue; padding:2 2 0} 테두리 A:hover {color:#blue; text-decoration:none; border:1 solid #blue; padding:2 3 0} 점선테두리 A:hover {color:#blue; text-decoration:none; border:1 dotted #blue; padding:2 3 0} 누르는효과 A:hover {color:#blue; text-decoration:none; position:relative; top:2; left:2} 스타일을 중복 적용하자 ################### 11 .daerew { color:black;} .daerew_bold { font-weight:bold; } 위의 스타일 두 개를 적용시킬 때 일반적으로 아래와 같이 사용합니다. <span class=daerew>내용</span></span></font> 이것을 보다 편하게 아래와 같이하면 여러개를 손 쉽게 적용할 수 있습니다. <span class='daerewdaerew_bold'>내용</span> 스타일시트를 이용한 글씨 세로로 쓰기 ################### 12 <center> <table border="0" cellpadding="0" cellspacing="0"> <tr> <td> <div style="writing-mode:tb-rl;"> 내용을 적어주세요^^ </div> </td> </tr> </table> </center> 가로 스크롤바만 없애기 ################### 13 <body> 에 아래의 구문을 추가해주면 됩니다. style="overflow-x:hidden;overflow-y:scroll" [ ------------------------------ 예문 ------------------------------ ] <body style="overflow-x:hidden;overflow-y:scroll"> ● 위의 소스가 적용이 안된다면 아래처럼해보세요 <body scroll=auto style="overflow-x:hidden"> 자동 줄바꿈을 통한 테이블 크기 고정 ################### 14 테이블 작업을 하다가 글의 내용이 길어지면 지정된 테이블의 크기가 늘어나는 현상이 있을 수 있습니다. 이럴 때 테이블의 크기를 고정시키고 자동으로 줄바꿈을 해주는 기능입니다. <table> 태그의 아래의 구문을 넣습니다. style="table-layout:fixed;" [ ------------------------------ 예문 ------------------------------ ] <table style="table-layout:fixed;"> ● 적용 시키고자 하는 셀에 아래의 구문을 넣습니다. style="word-break:break-all;" [ ------------------------------ 예문 ------------------------------ ] <td style="word-break:break-all;"> 점선 테이블 만들기 ################### 14 <fieldset style="line-height:15pt; padding:20; border-width:2; border-style:dotted; width:200; height:70; border-color: red;"> 내용 </fieldset> 2라는 숫자는 점선테이블의 두께를 정합니다. boder-style:dotted 는 선의 종류를 점선으로 하라는 명령이죠. 홈페이지 이중 링크 시키기 ################### 15 한 화면에서 두가지 형태의 링크를 주고 싶은경우가 있죠. 서로 색을 달리하거나 폰트크기도 달리한다든지.. CSS에서 링크하는 것들은 pseudo-classes 라고 합니다. pseudo-classes는 활용에 따라 다양하게 적용을 할 수 있습니다. 아래는 간단한 예제입니다. <html> <head> <style type="text/css"> A.blue:link {color: blue} A.red:link {color: red} A.foot:active {color: purple} A.foot:visited {color: blue} </style> </head> <body> <a href="http://startdesign.net" class="blue"> blue</a> <a href="http://startdesign.net" class="red"> red</a> </body> </html> 웹폰트 적용시키기 ################### 16 1. 웹폰트파일을 서버에 올린다. (웹폰트는 확장자가 *.eot파일이나 mwf 등이 있습니다) 2. 인클루드할 스타일 시트를 작성한다. ex) 작성예. 'daerew.css' 라는 파일이 있다고 가정하면 그 내용은 아래와 비슷할겁니다. @font-face { font-family:WEB정; src:url(웹정주소) } body, table, tr, td, select, input, div, form, textarea { background:#ffffff; color:#000000; font-size:9pt; font-family:WEB정; line-height:100% } 3. css를 적용할 html페이지의 head 사이에 다음의 소스를 적용합니다. <style type="text/css"> @import url(daerew.css); </style> 이렇게 소스가 적용이 되면 body, table, tr, td, select, input, div, form, textarea 가 들어가는 모든 부분의 텍스트가 웹정체로 나타나게 되는것이죠 .. ※ 일반적으로 폰트피아(http://www.fontpia.co.kr [새창에서 열기])의 웹정체를 많이 사용하지만 유료라는 단점이 있죠.... 무료 웹폰트도 많은데요 검색사이트에서 웹폰트 치면 많이 나온답니다. 무료 웹폰트 중에는 오늘과내일(http://ttcgi.com [새창에서 열기])의 티티체를 많이 사용하더군요. CSS Background The CSS background properties define the background effects of an element. 1. Set the background color (배경화면 색 조정) This example demonstrates how to set the background color for an element. <html> <head> <style type="text/css"> body {background-color: yellow} h1 {background-color: #00ff00} h2 {background-color: transparent} p {background-color: rgb(250,0,255)} </style> </head> <body> <h1>This is header 1</h1> <h2>This is header 2</h2> <p>This is a paragraph</p> </body> </html> 2. Set an image as the background (배경화면 지정하기) This example demonstrates how to set an image as the background. <html> <head> <style type="text/css"> body { background-image: url('bgdesert.jpg') } </style> </head> <body> </body> </html> 3. How to repeat a background image (배경화면 반복) This example demonstrates how to repeat a background image. <html> <head> <style type="text/css"> body { background-image: url('bgdesert.jpg'); background-repeat: repeat } </style> </head> <body> </body> </html> 4. How to repeat a background image only vertically (배경화면을 세로로 한 줄만 반복) This example demonstrates how to repeat a background image only vertically. <html> <head> <style type="text/css"> body { background-image: url('bgdesert.jpg'); background-repeat: repeat-y } </style> </head> <body> </body> </html> 5. How to repeat a background image only horizontally (배경화면을 가로로 한 줄만 반복) This example demonstrates how to repeat a background image only horizontally. <html> <head> <style type="text/css"> body { background-image: url('bgdesert.jpg'); background-repeat: repeat-x } </style> </head> <body> </body> </html> 6. How to display a background image only one time (배경화면 반복하지 않게)-<왼쪽 제일 윗 구석에 위치>) This example demonstrates how to display a background image only one time <html> <head> <style type="text/css"> body { background-image: url('bgdesert.jpg'); background-repeat: no-repeat } </style> </head> <body> </body> </html> 7. How to place the background image (배경화면을 가운데에 고정) This example demonstrates how to place the image on the page. <html> <head> <style type="text/css"> body { background-image: url('smiley.gif'); background-repeat: no-repeat; background-position: center; } </style> </head> <body> </body> </html> 8. How to position a background image using % (배경 그림 고정과 배경 그림 위치를 %로 조절) This example demonstrates how to position an image on the page using percent. <html> <head> <style type="text/css"> body { background-image: url('smiley.gif'); background-repeat: no-repeat; background-position: 30% 20%; } </style> </head> <body> </body> </html> 9. How to position a background image using pixels (배경 그림 고정과 배경 그림 위치를 픽셀로 조절) This example demonstrates how to position an image on the page using pixels. <html> <head> <style type="text/css"> body { background-image: url('smiley.gif'); background-repeat: no-repeat; background-position: 50px 100px; } </style> </head> <body> </body> </html> 10. How to set a fixed background image (배경화면을 왼쪽 제일 윗 구석에 고정) This example demonstrates how to set a fixed background image. The image will not scroll with the rest of the page. <html> <head> <style type="text/css"> body { background-image: url('smiley.gif'); background-repeat: no-repeat; background-attachment: fixed } </style> </head> <body> <p>내용</p> </body> </html> 11. All the background properties in one declaration (배경화면 색깔,배경화면 가운데에 고정) This example demonstrates how to use the shorthand property for setting all of the background properties in one declaration. <html> <head> <style type="text/css"> body { background: #00ff00 url('smiley.gif') no-repeat fixed center; } </style> </head> <body> <p>내용</p> </body> </html>
profile
팔공산
Nov 03 2008
리스트아래에 있는 SKY님과 BlueGATE님의 팁을 종합해서 그룹별, 포인트별, 레벨별로 위젯의 유.무를 나타나게 정리했습니다. 위젯을 만들때 참조하시라고 작성하는 글인 만큼 초보분들에게는 쉽지는 않을 것입니다. 먼저 바꾸어 보고자 하는 위젯(예; widgets/newest_document)의 1. newest_document.class.php를 불러와 아래의 소스를 추가해줍니다. //그룹지정 $widget_info->group = $args->group; if(!$widget_info->group) $widget_info->group = ''; // 포인트 $widget_info->point = (int)$args->point; if(!$widget_info->point) $widget_info->point = 0; // 레벨 $widget_info->level = (int)$args->level; if(!$widget_info->level) $widget_info->level = 0; // 노출 여부 체크 if($args->select_view!='Y') $widget_info->select_view = 'N'; else $widget_info->select_view = 'Y'; 2. widgets/newest_document/conf/info.xml파일을 불러와서 아래의 소스를 추가해줍니다. <var id="select_view"> <type>select</type> <name xml:lang="ko">선택별 표시</name> <description xml:lang="ko">그룹,포인트,레벨을 지정해서 위젯의 유무를 나타냅니다.</description> <options> <value>Y</value> <name xml:lang="ko">표시</name> </options> <options> <value>N</value> <name xml:lang="ko">표시하지 않음</name> </options> </var> <var id="group"> <type>text</type> <name xml:lang="ko">그룹지정</name> <description xml:lang="ko">지정한 그룹이면 위젯이 나타납니다.</description> </var> <var id="point"> <type>text</type> <name xml:lang="ko">포인트</name> <description xml:lang="ko">포인트를 지정해서 위젯의 유무를 나타냅니다. (기본은 누구나)</description> </var> <var id="level"> <type>text</type> <name xml:lang="ko">회원레벨</name> <description xml:lang="ko">회원레벨를 지정해서 위젯의 유무를 나타냅니다. (기본은 누구나)</description> </var> 3. widgets/newest_document/skins/xe_official/list.html파일을 불러와서 아래와 같이 배치합니다. <!--@if($widget_info->select_view == 'Y')--> <!--@ foreach($logged_info->group_list as $g)--> <!--@ if($g == $widget_info->group || $g == '관리그룹')--> {@ $oPointModel = &getModel('point'); $point = $oPointModel->getPoint($logged_info->member_srl); $oModuleModel = &getModel('module'); $config = $oModuleModel->getModuleConfig('point'); $level = $oPointModel->getLevel($point, $config->level_step); } <!--@if($point < $widget_info->point || $level < $widget_info->level)--><!--@else--> <div class="latest_{$colorset}"> - 내용생략 - </div> <!--@end--> <!--@end--> <!--@end--><!--@else--> <div class="latest_{$colorset}"> - 내용생략 - </div> <!--@end--> 칼라부분들이 추가된 부분입니다. 칼라별로 선택을 하시면 해당기능만 적용시킬 수 있으니 자신에게 맞게끔 응용하시며 됩니다. 특히 파란색부분인 선택적으로 유.무를 나타나게 할려고 하니 아무래도 내용부분이 두번 들어가서 소스가 무척 길어질 것입니다. 두껍게 선택된 부분들이 그룹,포인트,레벨을 지정하는 함수부분입니다. 위의 소스에서는 관리그룹은 항상 나타나게끔 적용되어져 있는데 필요없으시면 보라색부분 || $g == '관리그룹' 를 지우시면 됩니다. 아니면 다른 그룹을 적어주셔도 되고요. 샘플로 예전에 제가 만든 "최신글멀티카멜레온위젯"에 위의 팁을 적용한 것을 올립니다.mh_multi.zip
profile
팔공산
Oct 26 2008
XpressEngine업그레이드시 modules/document/document.model.php파일이 수정되어져 있다면, 이전글/다음글 기능을 사용한 버전을 설치하신분은 게시판클릭이 되지 않습니다. document.model.php 파일을 받아서 zbxe/modules/document 폴더에 덮어 씌워야 게시판이 정상적으로 작동됩니다. XE업그레이드시 files폴더를 제외한 모든 폴드를 삭제하시고 업그레이드 하신분들은 modules.zip 파일의 압축을 풀어서 modules 폴더전체를 zbxe폴더안에 덮어 씌우셔야 이전글/다음글 기능이 정상작동합니다. XE업그레이드 하셔도 문제없이 작동되게 할려면 다음글/이전글 적용안된 버전으로 설치하세요. http://www.zeroboard.com/17404385 에 있는 문하우스 3종 칼라 레이아웃에 어울리게 게시판스킨을 만들어 보았습니다. 예전에 SInulz님의 게시판을 약간 변형 https://moonhouse.co.kr/zbxe/200227 해서 사용해오다가 요번에 레이아웃에 맞게끔 약간의 기능과 디자인을 변경했습니다. 약간의 설명을 하자면 1. 확장변수를 리스트에 나타낼 수 있습니다, 2. 이전글/다음글을 버턴으로 구현했습니다.(선택사항) 3. 자동으로 비밀글을 선택할 수 있습니다. 4. 게시판목록 제목 줄바꿈 하지 않습니다. 그리고 확장변수에 주소기능 추가하고 싶으신 분은 board_insert.html 파일을 /zbxe/modules/board/tpl/ 폴더안에 덮어 씌우시면 됩니다. 버턴이미지는 버튼체인지 ButtonChange ver 0.2 애드온을 사용하시면 알맞은 버턴으로 적용할 수 있으므로 따로 만들지 않았습니다. [설치방법] A. 다음글/이전글 적용안된 버전입니다. moonhouse_board.zip 파일의 압축을 풀어서 moonhouse_board 폴더체로 /zbxe/modules/board/skins/ 폴더안에 업로드 하시면 됩니다. 해당게시판 설정에서 스킨을 "문하우스 게시판 스킨"으로 선택하시고 스킨관리에서 컬러셋(하얀색, 청록색, 초록색)중 선택하시면 됩니다. 게시판상단에 보이는 "로그인 정보 출력" 과 "설정 표시" 부분은 미관상 관리자로 로그인시만 보이게 하였습니다. 이 부분을 기본으로 돌리고져 하시면 /zbxe/modules/board/skins/moonhouse_board/header.html 67줄 <!--@if($logged_info->is_admin == 'Y')--> 121줄 </div> <!--@else--><!--@end--> 빨간색부분을 제거 하시면 됩니다. 121줄에 </div>는 제거하면 안됩니다. B. 다음글/이전글 적용된 버전입니다. moonhouse_board_1.4.zip + modules.zip 다음글/이전글 적용을 위해서 https://moonhouse.co.kr/zbxe/189370 에 있는 팁을 적용했습니다. modules.zip 파일의 압축을 풀어서 modules폴더 전체를 zbxe폴더안에 덮어 씌우시면 게시판에러도 안나고 다음글/이전글도 적용됩니다. [11월 8일 수정] 1. 내용보기시 타이틀밑에 가로선 IE6에서 잘못 쳐지던 부분 수정 /zbxe/modules/board/skins/moonhouse_board/css/common.css 41줄 부분에 height:50px;추가하면 됩니다. .boardRead .readHeader { position:relative; margin:10px 15px 10px 15px; height:50px; padding-bottom:10px; border-bottom:1px solid #bbbbbb; } 2. 이전/다음 버턴 위치조절 및 문제점 수정 /www/zbxe/modules/board/skins/moonhouse_board/view_document.html 143줄 부터 아래와 같이 수정 <!-- 목록, 수정/삭제 버튼 --> <div class="contentButton"> <div class="contentButton1"> {@$oDivision = &getModel('document')} {@$nextdocu = $oDivision->getDocumentDivision($oDocument->document_srl,'next','list_order')} {@$prevdocu = $oDivision->getDocumentDivision($oDocument->document_srl,'prev','list_order')} <!--@if($nextdocu->document_srl == "")--><!--@else--><a href="{$nextdocu->document_srl}" class="button"><span>{$lang->cmd_prev}</span></a><!--@end--> <!--@if($prevdocu->document_srl == "")--><!--@else--><a href="{$prevdocu->document_srl}"class="button"><span>{$lang->cmd_next}</span></a> <!--@end--> </div> <div class="contentButton2"> <!--@if($module_info->default_style != 'blog')--> <a href="{getUrl('document_srl','')}" class="button"><span>{$lang->cmd_list}</span></a> <!--@end--> <!--@if($oDocument->isEditable())--> <a href="{getUrl('act','dispBoardWrite','document_srl',$oDocument->document_srl,'comment_srl','')}" class="button"><span>{$lang->cmd_modify}</span></a> <a href="{getUrl('act','dispBoardDelete','document_srl',$oDocument->document_srl,'comment_srl','')}" class="button"><span>{$lang->cmd_delete}</span></a> <!--@end--> </div> </div> </div> /zbxe/modules/board/skins/moonhouse_board/css/common.css 88줄 부터 아래와 같이 수정 .boardRead .contentButton { margin:10px 0 5px 0; border-top:1px solid #DDDDDD; padding-top:10px; } .boardRead .contentButton1 { float:left; } .boardRead .contentButton2 { text-align:right; } 3. 3개의 칼라(블루, 그린, 하이트)에서 오렌지,레드 2개의 칼라추가로 총 5가지의 칼라색상을 지원합니다. 4. 상단의 가로폭이 고정되어 있던 것을 게시판크기에 자유롭게 맞게끔 수정되었습니다. 5. 게시판리스트에 코멘트 출력을 선택할 수 있게 하였습니다.(설정에서 선택가능) https://moonhouse.co.kr/zbxe/xetip/225348 팁 적용 6. 그리고 저번 버전에는 제가 실수로 저의 구글에드센스코드를 지우지 않고 배포했습니다 죄송합니다.(제거함) p.s 위의 수정내용들이 추가된 버전이 지금 올려줘 있는 파일들입니다. [11월 25일 v1.3 수정] 1. 내용보기시 제목이 한줄을 넘을때 틀이 깨지는 문제 해결했으며, 타이틀박스 밑에 가로선 문제 해결됨 2. 타이틀박스안에 내용들 아이콘추가함 3. 갤러리형식으로 적용시 좌,우측 여백문제 [12월 22일 v1.4 수정] moonhouse_board_1.4.zip +modules.zip 1. xe1.1.2에 맞쳐서 약간 수정이 된 부분입니다. v1.3에서 문제가 없다면 굳이 업 안하셔도 됩니다.

지도 바로가기 - 스케치북 리스트스킨

게시판 제목 종료일 위치 글쓴이 날짜 조회수 지도
충청 충주 중앙탑 file 충주 중앙탑 팔공산 2024.03.20 113
서울 서울 이순신장군 동상 file 서울 이순신장군 동상 팔공산 2024.03.20 102
전라 쏠비치 진도 file 쏠비치 진도 팔공산 2024.03.20 123
강원 정동진 모래시계공원 file 정동진 모래시계공원 팔공산 2024.03.20 95
대구 종료 앞산공원 전망대 file 2025-04-30 앞산공원 전망대 팔공산 2023.03.29 129


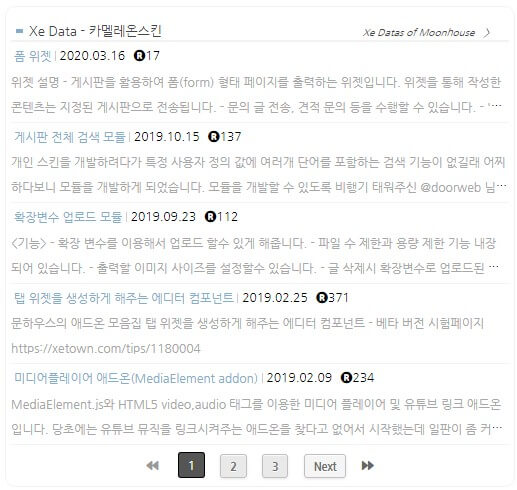
Mh_Multi Widget 특징


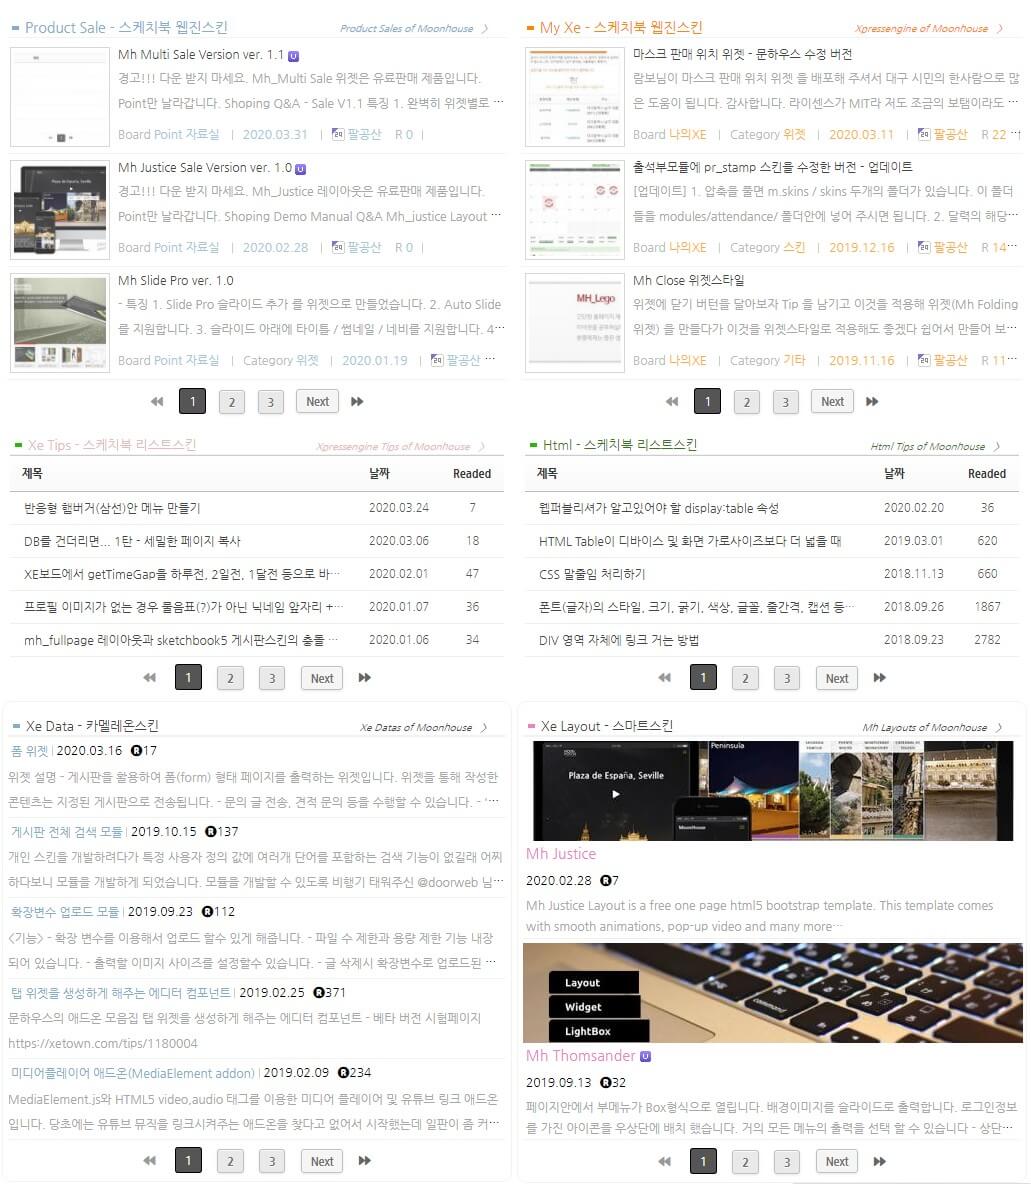
It's a multi widget that we've been creating since the XE super window, so you can output widgets in almost any form.
 

mhmulti-001.jpg


[업그레이드 내용]

•문서내의 모든 이미지를 썸네일로 출력 기능 추가(선택가능)

Screenshot 2020-10-05 at 13.00.27.jpg


 1. Mh_multi Widget 에 총 5가지 Skin이 포함되어 있으며 Skin 마다 각각 고유의 형테로 구성    

    • 완벽히 위젯별로 작동합니다.

       - 동일 Skin 으로 한페이지에 다수의 위젯을 생성할시 위젯설정에 "위젯 NO"를 다르게 적용

       mhmulti016.jpg 


  2. 거의 완벽한 반응형(모바일형)으로 츨력이 가능

    • 함께 배포되는 mhstyle 위젯스타일 적용시

       - https://moonhouse.co.kr/xetip/469297

     mhmulti-008.jpg


  3. 간단한 설정 으로 색상변경 가능

    • 총 9가지 색상 선택

     mhmulti-009.jpg

    • 위젯 타이틀, 게시물 제목, Hover 테두리, more색상등 변경

     line.jpg

    • 설정 옵션들에서 자신만의 컬러로 변경 가능 


  4. 거의 완벽한 설정으로 각 위젯이 카멜레온처럼 변형이 가능 

    • 페이지기능으로 Total게시판 기능으로 활용

       - ajax 기능으로 화면 리플레쉬 없이 작동합니다.

    • 모든 항목을 추가, 제외 가능 - 썸네일, 테두리, 위젯타이틀, 제목, 내용, 글쓴이, 날짜등

    • 모든 항목의 색상 지정 가능 - 테두리, 제목, 내용, 바탕색, Hover색상등


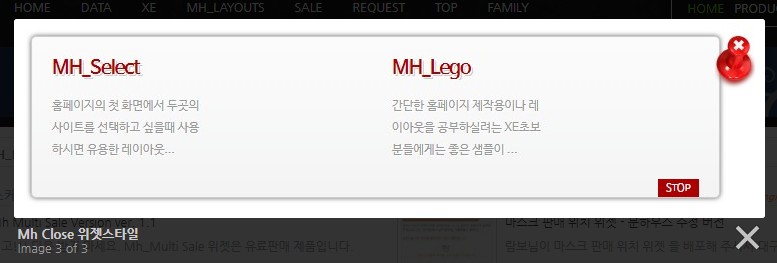
  5. 썸네일 클릭시 3가지 형태로 츨력가능 

    • 기본적으로 게시판으로 연결

    • Right Box 형식으로 출력
     mhmulti-010.jpg

    • Zoom 형식으로 출력

     mhmulti-011.jpg 


  6. 다양한 설정

    • 대상 모듈의 대상 분류 srl값으로도 출력 가능

    • 내용글 세로 칸 수를 지정해서 공간의 여백을 최소화

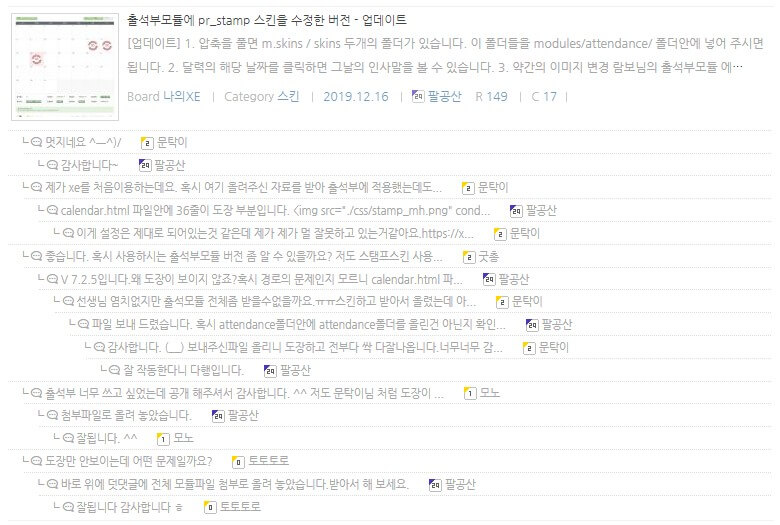
    • 댓글 출력가능
     mhmulti-012.jpg

    • 그룹별, 포인트별, 레벨별로 출력 가능

     2021-09-23 123907.jpg

    • 모듈명, 분류명 출력 가능

     mhmulti-014.jpg

    • 확장값 출력 가능

     mhmulti-015.jpg


  7. MoonHouse 자료들은 폰트어썸과 Sexy Button 그리고 말풍선(툴팁) 애드온들이 자주 사용됩니다.

      Web Fonts Addon  /  말풍선(툴팁) 애드온을 설치해서 애드온들을 활성화 시켜야 아이콘과 버턴들이 정상적으로 출력됩니다.

      페이지기능을 지원하는 Widgets의 경우는 "위젯 케시를 0" 으로 둬야 정상 작동합니다.


Shoping Demo Manual Q&A


Mh_Multi Widget 메뉴얼


1. 총 5가지 Skins


 1. Sketchbook5 Webzin 형태

     mhmulti-002.jpg


 2. Sketchbook5 List 형태

     mhmulti-003.jpg


    •SketchBook5 게시판스킨 - 문하우스 수정버전 Pro 와 연동하여 날짜지정 종료/진행중/종료임박/오늘종료 버턴을 출력할 수 있습니다.

       - https://moonhouse.co.kr/xetip/506303

     mhmulti-004.jpg


 3. chameleon 형태

     mhmulti-005.jpg


 4. Smart 형태

     mhmulti-006.jpg


 5. Scroll - 공지사항형태

     mhmulti-007.jpg

Mh Product Sales

This area displays Product Sales made by Moonhouse.

Mh Justice Layout

Mh Justice Layout is a one page html5 bootstrap template.
This template comes with smooth animations, pop-up video and many more…

1. As soon as onePage is operated and the bootstrap and animations are applied, the animation is output in each section.

2. Almost perfect response (mobile)

3. Built-in various self-programming programs
• accordion menu
• iPhone background login pop-up
• Background slide
• Notice pop-up window

Read more

Mh Multi Sale

It's a multi widget that we've been creating since the XE super window, so you can output widgets in almost any form.

1. Works perfectly per widget. - Old versions create multiple widgets on one page with the same skin, causing problems with page function or multiple places

2. Add shortcut to on the title bar the top of the two.

3. can print out the source, without using a using the image output rightbox.

Read more